Showing posts with label food. Show all posts

11 October 2013

Jam Session

Last month's jam-making went very well.  The first day, I put up 12 half-pint jars altogether: nine strawberry, three peach.   Over the course of three days' work, we ended up with 36 jars, about half peach, half strawberry; four of them a combination of the two.

I combined a couple recipes (one here and one here) and adapted them, so I guess I can post my version here.  I followed a small-patch process and found it to be manageable for a first-time jam-maker.  Sometime in the last year, I watched a video that compared assembly-line-style task management with performing a repeating task over and over from start to finish and the results were pretty interesting.  I still have some questions about the video itself (and thus, I'm not posting it), but found that doing everything in smaller batches was much easier on my hands as I wasn't repeating each motion without a break to do other things.  Also, while I clung to the recipe pretty fearfully the first time through, the second, third, and fourth time through I had it down and was able to move more smoothly and with more confidence.  If I'd done large batches, I may have done each kind of jam once, but I wouldn't have learned the process as well, which stood me in good stead over the next few days.

Step One Ingredients:
  • 4 cups cut up fruit (I used peaches or strawberries, but this would probably work with other fruit or a blend of two or three, too)
  • 1/2 to 3/4 cup xylitol, depending on how sweet (ripe) your fruit is
  • vanilla extract or 2 split vanilla beans (I didn't measure the extract, but it was between one and two teaspoons.  If you use beans, scrape the beans from the pod and mix them well into the fruit, then drop the pods in too.  I used extract with the peaches and beans with the vanilla.)

Step One Instructions:
  1. Mix everything up in a bowl, then transfer to a quart jar.  
  2. Let it sit in the fridge at least overnight.  I cut my fruit up on Saturday and didn't start making the jam until Wednesday.  As long as it stays cold and the fruit doesn't go bad, you're golden.

Step Two Ingredients:
  • the quart jar of cut up fruit (which will have shrunk a little and have a lot of yummy juice at the bottom)
  • 3/4 - 1 cup xylitol (again, depending on how sweet your like your jam and how sweet your fruit is)
  • 1 1/2 Tbsp lemon juice
  • a couple pinches of salt (brings out the sweetness better than adding more sweetener)
  • Pomona Universal Pectin (mix the calcium packet with 1/2 cup water and open the pectin packet, which you'll be measuring out with a teaspoon): 2 teaspoons of calcium water and 2 teaspoons of pectin powder

Step Two Instructions:
  1. Pour your fruit into a skillet (cooks faster than a deep pot).
  2. If you used vanilla beans, they're probably very soft right now.  Softly scrape them again and mix the rest of the beans into the fruit.  Discard the pods.
  3. Add xylitol, lemon juice, a couple pinches of salt, and calcium water.  Mix it up!
  4. Gradually add two teaspoons of pectin powder, whisking it in so it doesn't clump (If there's an easier way to do this step, I'd love a comment to enlighten me!).
  5. Heat the mixture to 220˚.  Some instructions will tell you to cook until it's thick enough not to run when you dip a spoon into it and run another spoon across the back of it, but some of my batches aren't jelling the way I'd hoped they would, so I'm going to stick to the thermometer from now on; the somewhat confusing part for me was that those last few degrees take a long time.
  6. Pour into three clean and dry 1/2 pint jars, leaving about 1/2 inch of head room.
  7. Wet bath process the jars for 5 minutes.  Since I'm so new at canning, I'm not going to include instructions, but there are lots of books and websites that break down the process and instruct in safe measures.  I've had only two jars that didn't seal.  I'll re-process them again tomorrow, and if they don't seal after being re-processed, we'll eat them right away.


Variations: I added some lime juice to the strawberry jam to try to develop a more complex flavor, and I think it worked.  I also added apple pie spices to the peach jam and substituted coconut crystals for some of the xylitol.  A few batches of strawberry jam also received a few shots of moscato d'asti.

We've been enjoying the jam with crème bulgare and a grainfree bread recipe that we're still working on (coming when we perfect it).  It's also good on grainfree crackers.

SDG!

13 September 2013

This Morning's Chapter...

...of Linnets and Valerians...

11 September 2013

Jam and Jelly Progress

I spent a lot of Saturday chopping strawberries and slicing peaches (but not so much that I didn't have time to spend with a friend and attend another friend's birthday party).  The fruit has been sitting in jars in the fridge for the last couple days, macerating in xylitol and vanilla (split beans with the strawberries, homemade extract with the peaches).

I also saved my peach peelings; I boiled them for about a half hour yesterday and then let them steep all night to prepare to make peach jelly.  This morning, I strained out the juice and then squeezed all the peelings in a cloth to get every bit of juice.  I have over a gallon (I think - it's in a big mixing bowl, not in a measuring cup or a pitcher).

After school today, I'll be working on my first few batches of jam.  I'm using small-batch recipes so that I don't feel overwhelmed my first time jam- and jelly-making.  I've never canned before, either, but after seeing some of the pictures on other blogs, I realized that it's not as completely complicated as I thought it would be and that I already have the big equipment.  I did invest in a six-utensil canning set, but that was only about $10.

On my radar:


  1. how to make vanilla bean paste
  2. how to make cola syrup with xylitol to mix with club soda for a low-cost, sugar-free soda
  3. learning about aromatherapy (I'm thinking about studying chemistry with my high schoolers when they start next month as a beginning point)
  4. perfecting my sugar-free (almost), grain-free chocolate chip cookie recipe (improved from Alton Brown's recipe and, really, almost there)
  5. experimenting more with almond flour, coconut flour, and whey powder as a substitute for wheat flour (trying to adjust Paula Deen's peach cobbler recipe for dessert tonight; also want to work on sandwich wraps, crépes, pancakes and waffles, and English muffins to go with all this jam!)


SDG!

26 July 2012

Crème Fraîche

Yes, it's been forever.  I've been posting a few things on Facebook that I realized this morning I could post here and then share on Facebook, so that's what I'll be trying to do from here on out.

For those of you who don't know what crème fraîche is, you're in for a treat!  It's a gently soured cream, not as tangy as sour cream but very smooth and very French.  In my efforts to increase the healthy fats in my diet, I've been adding a couple dollops to my scrambled eggs each morning.  Wow!

I've made crème fraîche in the past by adding a tablespoon or two of cultured buttermilk to a quart of cream and letting it sit out overnight.  The rest of the buttermilk was then used for baking.  But I'm not really baking anymore (both in avoidance of grains and in avoidance of adding extra heat to our hot afternoon house).  I bought some crème fraîche from the gourmet grocery store last week (cha-ching!).  I was almost out and I thought I'd give something a try ("I tell you, LaFou, I've been thinking." "A dangerous pasttime." "I know.").

I added a couple large dollops of crème fraîche to a pint of cream and let it sit on a kitchen counter in a mason jar for 24 hours.  It thickened up nicely, but didn't smell quite tangy enough this morning, so I let it go another 12.  I still have to decide if I'll put it into the fridge tonight or tomorrow morning, but it's smelling pretty good right now.  Even though it wasn't quite done, I used a little in my eggs this morning and it tasted great.

I'm not sure how long I'll be able to keep this up.  Hmmm…maybe if I store a couple spoonfuls in the freezer, I can use that to start my next batch, the way I keep a small jar of yogurt in the freezer as starter?  I guess I'll find out!

I've also been making water kefir - just started this week, but that's a post for another day!

SDG!

26 September 2011

Yogurt, My Final Word

I've been asked about my yogurt process lots of times since my series about what I learned in my yogurt journey. I usually send people a link to a Google search of my blog and 'yogurt'. But last night, a good friend said that she always does better if she can see the process, so here it is, all pulled together into one post and with pictures!

This makes a gallon of yogurt (unstrained). I'll include variations throughout.


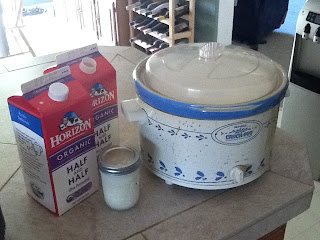
We start by pouring a gallon of half-n-half or heavy cream (when it's on sale) into the crockpot, set on low.


If we've forgotten to pull our starter (in this case, a small jar from our last batch that was put into the freezer) out the night before to thaw in the fridge, we place the frozen jar next to the hot crockpot to defrost.


Once the half-n-half/cream reaches between 112˚ and 120˚ (about an hour and 20 minutes for us, but your mileage may vary), we fill empty, clean jars with hot tap water to warm up (like filling a teapot with boiling water to warm up before actually making tea with a fresh infilling of boiling water and tea). While the jars warm up...


...ladle some of the hot cream/half-n-half into a measuring cup or a deep bowl.


Pour in the thawed starter.

If the starter is still very cold, the cream can be on the higher side of the temperature range. If using Yogourmet starter (one envelope works great for a gallon of yogurt; I've seen recipes that call for four envelopes for a half-gallon of yogurt -- what a waste!), store-bought, plain yogurt, or we did remember to thaw our frozen started the night before, we aim for the lower side of the temperature range.

I'd like to try a cup of plain, store-bought Greek yogurt as a starter, as I've heard it has more kinds of cultures.

Once the starter thaws, it gets thin and runny, but never fear. The cultures are fine and the yogurt should thicken without a problem. If it doesn't, it's not because of the frozen and thawed cultures. Freezing it keeps it fresher longer and you'll be able to get more batches out of each starter before it goes sour, saving money.


Whip it up until there are no lumps.


Pour back into the crockpot.

If you want to add flavoring, it can go in now. I keep ours plain so we can each flavor it individually or I can use it in Silky Buttery Chicken to marinate the meat (see the link below!).


Fill the warmed and dried jars with the cream/half-n-half and cultures mixture and put the lids on. Don't forget to wash, warm, and re-fill your starter jar!

You could probably add different flavors to each jar.


Put them under a thick bath towel or two on the counter to culture.

I used to use four quart jars plus the small jar, but we've been using our quart jars for so many other things lately that I'm running out. Once we replenish our supply, I'll go back to the four quart jars. They fit into our fridge better and my husband takes one to work for snacks there. They also hold the heat better, but the yogurt still comes out thick, even in plastic containers.


After four or five hours, it's nice and thick. Into the fridge it goes to chill.

If it hasn't thickened up after that amount of time, I'll put a heating pad under the jars under the towel and turn it on low or medium for 20 minutes to a half hour. That always seems to do the trick.

This is a good time to strain it for thicker, more Greek-like yogurt. I'm out of cheese cloth now, but want to try this in the near future. I'll try to strain it overnight in the fridge to get out all the whey.


Here it is! Nice and thick and creamy, topped with fresh blueberries.

Since I'm not baking anymore, I've been throwing the whey away, but now that I'm trying some low-carb baking, I may save it and experiment with the new recipes.


SDG!

24 September 2011

Food Frustrations

One of the big changes that's taken place since I was posting more regularly is that we've gone low-carb. I've eliminated grains, and cut way down on starches and sugar. (A couple of book reviews coming up! And, no, this won't become a low-carb blog.)

I'm feeling so much better than I have in a long, long time. The volcanic acid reflux that was waking me up three or four nights each week disappeared with the grains. My wrist soreness is gone (I had a couple of weird lumps on the insides of my wrists that doctors had no ideas about and was experiencing severe pain when I typed - not so good when one has a deadline and lots of computer work to do to meet said deadline!), and my digestion is greatly improved. I have more energy and it's much easier to stop eating when I'm full (something that was nearly impossible when I was eating grains, wheat to be specific). I haven't had any incidents of hypoglycemia at all. If it's 'time to eat' and there's nothing appropriate around, it's no problem to simply wait until a more opportune moment. I've also found that my previously-thought-untameable sweet tooth has learned to heel - no more cravings for sweets. Even dark chocolates haven't been as appealing as of late.

For the most part, we're eating meat, a good amount of healthy fats, eggs (our newest batch of chickens is beginning to lay!), lots of veggies and salads with feta and olive oil and balsamic vinegar as dressing. Snacks consist of fruit (mostly berries, so far) and almonds (yum!). I'm drinking raw milk, just a little at a time a few times each week, some tea and cold-brewed coffee with a little turbinado and heavy cream, and lots of water. I also splurge every once in awhile with hard cranberry lemonade, hard cider (there's a wonderful, light, hard cider served at our local Irish Pub), or a glass of wine. I'm working to keep fresh bone broth (chicken or beef) on hand, especially when the weather cools down and I'd like something that isn't sweet to warm me up. I wish we could afford more pasture-raised meats, but with the size family we have, that's just not in the cards right now. So we focus on pastured butter

I've started trying to experiment with coconut and almond flours, but I'm not doing too well with them! I've come to the conclusion that it's better not to try to eat low-carb versions of high-carb foods for a couple of reasons. First, low-carb versions of high-carb foods that are processed foods include lots of starches to work toward the same textures. The starches, however, raise blood sugar levels too high for me with my weight-loss goals. Second, the low-carb varieties never taste as good as the real thing and they remind me how much I miss the real thing. This sets up psychological cravings, mostly for bread. (I love bread, but it doesn't love me back!)

But, my family (also doing better with no grains) does appreciate my efforts at the variety, so I'll keep trying. The problem is that I know how wheat flour behaves and how to make it do what I want. I need to find a way to learn how coconut flour and almond meal (and other nut flours and meals) work so I can not only follow others' recipes, but play around with them myself.

More on this as time goes on!

SDG!

18 May 2010

Homemade Shake 'n' Bake

Sorry I haven't been posting much lately (if anyone is still reading). Been pushing to finish school and graduate student no. 3, while working on The Abigail Adams Project and a secret project that will be released in July.

Anyway, tonight for dinner, the kids pulled out 30 chicken drumsticks and I had to figure out what to do with them. I improvised!

In a gallon-sized zipper bag, I put some bread crumbs, some Spice House Northern Style Barbeque seasoning, and a couple pinches of salt (sorry, I didn't measure any of it and had to do three batches, which probably will all taste different). Then I rinsed each drumstick and placed a couple in the bag, shook them up and now they're all in the oven. It's great grilling weather, so we may finish them on the barbie before we eat, just to give them that certain je ne sais quoi.

The kids will sauté up some potatoes (we were given a 50 lb box straight from the farm and, boy, are they wonderful!) and some veggies to go along with the chicken. Yum!

16 January 2010

Menu Plan & Shopping Update

First the plan itself:

Sunday: roast beef, potatoes, carrots, swede, onions
Monday: baked potatoes with the works
Tuesday: stew w/bread (made from Sunday's leftovers)
Wednesday: French onion soup
Thursday: beef pitas (made from the rest of Sunday's roast beef, along with bell peppers, onions, & mushrooms (all purchased on sale) and spiced according to the Greek lists in Culinary Artistry)
Friday: chowder & clamcakes
Saturday: lasagne w/veggie & baguettes

As Judith and I sat down to try to get all this (plus breakfasts, snacks, and lunches) figured out, we were a bit stumped. I've gotten out of the habit of looking at the sale papers and I was finding it difficult to get back into the groove. My other kids were waiting to start a movie until Judith and I were done, so we were both feeling some pressure. Then I had a brilliant idea - at least, I think it was brilliant!. I pulled the other kids in and handed them each a sale paper from a different store. Then, when I needed to check the price on something, they each looked to see if it was on their particular ad. It became a bit of a contest among the boys to see who could find the best price. Once the other kids started working with us, it went much, much faster. Judith entered items into the price book and I ran the calculator and organized our shopping list. I think we'll have all the kids help in the future.

Then, today, Judith and I spent the day shopping - mostly loss-leaders at five grocery stores. It was tiring, but, by the end of the day, we still had over $100 dollars of the budget left to get us through the next couple of weeks (milk and produce and anything we may have forgotten). That should be a pretty easy couple of weeks. Last time we went shopping, at this point, we had only $35 left (and we made it with $2 to spare).

Today, I began to explain to Judith how they lay out grocery stores, with an odd number of aisles and the main things (produce, meats, dairy, bakery) around the outside perimeter to encourage as much impulse buying as possible. Next time we go, I'll start to show her how the shelves are arranged, with the higher-priced goods at eye level. (We did a lot of bending, today.)

What sorts of things are you teaching your children about marketing to help them when they grow up?

SDG!

09 January 2010

New Meal Plan

Sunday: maple-glazed pork roast, potatoes au gratin, salad

Monday: chicken noodle soup (made with chicken wings), homemade bread

Tuesday: no peek pork and rice, salad (made with leftover pork)

Wednesday: French onion soup w/slices of homemade baguette with cheese melted on them, carrot sticks, broccoli & dip

Thursday: hotdogs & beans (hotdogs were on special for half price)

Friday: beef stew & homemade bread (made with meat that's already in the freezer and leftover veggies)

Saturday: baked potatoes with lots of different toppings

SDG!

05 January 2010

Groceries

My 17 yodd is apprenticing with me in meal planning and grocery shopping this year. Because of some health issues, for the past year or so, I haven't been putting in the time and thought that I should be.

Our first step was a 2-week menu plan. I recreated a spreadsheet that I've used before. One column for the day of the week, another for the date (set up so that I only have to change the first date and all the rest re-set by themselves), another for our plans that day, and one each for breakfast, lunch, snack, and dinner.

In our efforts to save money and submit ourselves to the discipline of the church calendar (including efforts to make Sunday a bit more special than the rest of the week), we've eliminated sweet snacks Monday through Saturday (fruit is as sweet as we'll get during the week). Sunday dinner will be the nicest meal of the week (including a nice dessert), with leftovers used throughout the week. This week's dinner plan looks like this:

Sunday: maple-baked ham; spaghetti squash; cranberry, almond, feta salad; cannolis

Monday: Tuscany peasant soup (beef and tomato base with sweet Italian sausage, onions, tomatoes, summer squash, and zucchini - leftovers for lunch Tuesday with grilled cheese)

Tuesday: three quiches - one with leftover ham, asparagus, and cheese; one with leftover Italian sausage and veggies from the soup; one with breakfast sausage (leftover from biscuits and gravy in honor of our son who is heading back to college next week) and fresh tomatoes from the basket of produce we bought through Bountiful Baskets. We're also planning a King Cake in honor of Epiphany, which we'll eat while we watch Twelfth Night (and thus ends our holiday season).

Wednesday: turkey sauce (pronounced the French way: soce), which is simply leftover turkey in a blond roux served over potatoes, and a veggie

Thursday: ham and cabbage soup (leftover ham, half a head of cabbage), with homemade bread

Friday: noodle bowls with leftover ham and the other half of the head of cabbage

Saturday: spaghetti and meat sauce with veggie and homemade bread

If there's any ham left after all that, I'll make ham salad for lunches next week.

SDG!

08 December 2009

Gravy

Last night's dinner was a simple pot roast, but I changed it up a little and it was better than ever. And it didn't take much extra time or effort.

Instead of adding water to my green-with-white-speckles roasting pan, I added a carton and a half of beef stock. I put the veggies (carrots, onions, potatoes) in first and then sprinkled them liberally with salt and parsley. Then I placed the roast (still frozen because of a miscommunication with the kidlets) on top of the veggies, where it sat above the level of the broth and the juices would run down onto the veggies.

After roasting for 4 hours (I told you it was frozen), we removed everything from the pot and covered it with foil to keep warm. Normally, I serve the juice alongside the roast, but yesterday was cold (for Arizona) and rainy and I felt like making some gravy.

I got out my trusty Culinary Artistry and looked up 'beef'. We strained the juice into a pot, which I then turned on to simmer after adding some chopped shallots, basil, red wine, and a bit of salt and white pepper.

On another burner, I made a blond roux in a small skillet. (I would have made a darker roux, but my family was as hungry as a pack of wolves, so I thought it best to speed up the process a little.) Once the roux was cooked sufficiently, I added a little of the broth to the skillet to begin the process of loosening up the roux to make it easier to incorporate into the broth. Then I whisked the loosened roux into the pot of broth and served. It was the first beef gravy I've ever made, and the best beef gravy I've ever eaten.

I used to make gravy with milk shaken together with flour and poured into whatever base I was using. In order to avoid lumps, I had to stand over it and whisk it constantly (and hope I'd added enough flour to thicken it, but not too much milk to dilute the flavour). In order to get rid of the floury taste, I had to simmer it for quite awhile (whisking the whole time). It was a hot and steamy business.

By using roux, the gravy comes together much more easily and I know it won't taste floury, since the flour is cooked more efficiently in the skillet than in the base. And since the butterfat coats the flour particles, they don't clump together, which gives me a smoother gravy with less effort.

SDG!

07 November 2009

Guavas!

Last Saturday, we finally got our first Bountiful Basket. Everything has been wonderful!

Included in the basket were a couple paper bags of a small, yellow fruit that I'd never seen before.


In desperation, I posted these photos on Facebook and one of my friends rode to my rescue by telling me that they were mini yellow guavas. So, I then had to figure out what to do with them. They smelled heavenly!

So I looked up 'guava' in my trusty Culinary Artistry to get some ideas and picked out a few ingredients that I had on hand. We ladled the sauce over a butter cake that Judith had made earlier in the day and, well, wow! It was amazing!! Here's what I did:

In a saucepan, I simmered some sweet white wine with a split and scraped vanilla bean. Once the wine had reduced by about a half to two-thirds, I fished out the bean and whisked in the paste I got after peeling, cutting, and pushing about six of the guavas through a fine mesh strainer. I added a pinch of salt, a pinch of mace, and about a teaspoon of sugar. Then I whisked in some heavy cream. (I'm sorry, but I have no measurements for any of this - I was pouring and flicking ingredients into the pan using nary a measuring cup or spoon.) I heated up the sauce a final time, but not to a boil and we indulged. I cannot express how good this was - sweet, with enough tang to keep it from becoming cloying, and the vanilla and wine complemented one another beautifully. (mmm … I have more guavas in the fridge and am itching to make this again, soon!)

SDG!


19 October 2009

Inspired by Julia

Life is beginning to calm down after a hectic and difficult several months. Not only did I have energy and time to cook tonight, but my back is feeling well enough that I was able to putter around the kitchen tonight, with help from Drew and older kiddoes.

I went to see Julie & Julia with some girlfriends a few weeks ago. I was taken by the Julia storyline and would have relished more of her and less of the more modern story. I'm about half-way through My Life in France and I was also able to pick up Julia's Kitchen Wisdom. I'm inspired! (No, I'm not going to cook my way through her books, but I'll share what I learn!)

I was hoping to make a cheese souflé for dinner, but school took longer than I thought it would and I had a late afternoon chiropractor appointment. I wasn't sure what to do about dinner, when Drew mentioned that we had some porkchops in the freezer. We put them in to soak in a sink of hot water and they were defrosted when we returned home. I poked around in my CIA Cookbook and decided to make a Lyonnaise sauce to go with the chops (it was more a variation of a Lyonnaise sauce - I had no demi-glace, so we substituted beef stock). After sautéing the chops, we added to the pan butter, a finely chopped onion, white wine (a Pinot Gris), some late harvest Riesling vinegar (yes, it's amazing!), and some salt and white pepper. After the onions were cooked and the liquids reduced, I added some store-bought beef stock (have you ever seen pork broth on sale at the grocery store? I figured beef was close enough). This simmered for awhile and reduced even more. It was absolutely heavenly.

We'd stopped and picked up a couple of baguettes (I've not been baking lately because of my back) and I made a white wine and butter reduction and then sautéed some leeks in it; I also added tarragon, parsley, salt, and white pepper. After baking the baguettes for about 10 minutes in a 450˚ oven to crisp up the crust, we sliced the bread and ladled the leek and butter sauce over the top. More heaven!

I don't have measurements for any of this, but it wasn't hard. I was playing with the technique of reducing liquids before using them that Julia mentions in her books.

On tap for later this week: orange roughy filets with a beurre blanc sauce; Hungarian goulash (after I receive my sweet Hungarian paprika from The Spice House); and Julia's boeuf bourguignon; oh, and that cheese souflé, baked in phyllo dough sheets.

06 May 2009

My Grocery Shopping Philosophy

A philosophy for grocery shopping?  Well, yeah, I think we should have a philosophy for everything - grocery shopping, furniture arranging, the way we dress - everything (whoever said caring for the home was a mindless job certainly had no idea).  

So, here's my grocery shopping philosophy.  [drum roll, please; cue the choir] 

Purchase ingredients.

Whew!  I'm glad I got that off my chest!

I'd rather have my pantry stocked with flour, oil, cocoa, sugar, vanilla, and baking soda and powder and my fridge with butter, milk, cream, eggs, and yeast than with lots of packaged mixes.  With those ingredients, I can make brownies or crépes (sweet or savory) or yellow cake with chocolate frosting or sugar cookies or pancakes or tortillas or bread or crackers or biscuits or baguettes (my newest baking challenge) or pie crust or English muffins or crumpets; you get the idea and I'm getting hungry.  Making sure that I'm stocked up with the basics gives me much more flexibility than purchasing mixes.  I can go with the flow much more easily.

So, why is this a money saver?  Well, even though I've rarely seen a coupon for a dozen eggs or a gallon of milk, ingredients still end up being cheaper than mixes.  They're also healthier.  And if you find a screamin' deal  (let me know, okay?), most can be stored without refrigeration (storage costs need to be figured in, too).  Just as it's easier to de-clutter the kitchen with multi-use tools rather than lots of space-hogging, single-use gadgets, it's easier to declutter the pantry with multi-use ingredients rather than lots of single-use packaged mixes.

Using teriyaki sauce as an example: I could purchase a bottle of teriyaki sauce.  It wouldn't take up that much space.  But it's teriyaki sauce and that's all it can ever be.  Yes, I can use it in a meat marinade (recipe coming soon) or in stir fry, but there isn't much else I can do with it.  However, if I have brown sugar, garlic (something like this), fresh minced ginger, and soy sauce on hand, well, life just got much tastier.  I can use the brown sugar for granola, on yogurt, for cinnamon/raisin bread, bread pudding, pancakes, rum sauce, etc.  (Is there anything brown sugar can't be used in?)  I can add a bit of ginger to chicken soup, cookies, bread, pudding, tea for an upset tummy, etc.  Garlic goes in just about anything and we use it all the time.  Soy sauce goes well in marinades, soups, veggies, noodles, and rice.  I can still have teriyaki anytime I want to make it, but I have lots of other options, too, because I bought separate ingredients.

Now, it's not like I didn't have the ingredients for teriyaki on hand before, well, except for the ginger - that's a new thing in my fridge (I've never been much of a fan of dried ginger and the jar in my pantry is at least 25 years old, but the fresh stuff is heavenly), but by not purchasing a bottle of teriyaki, I'm saving space.  You could argue that I simply traded a bottle of teriyaki for a jar of ginger, but I can do so much more with ginger than I could with teriyaki, that I still think I've come out ahead.  But really, how much space does a bottle of teriyaki sauce take up?  Not much, but that's where having a full-blown philosophy comes in.  If I do this over and over again, searching out recipes that use basic ingredients that I have on hand for bottles, jars, or boxes of things I might otherwise buy, the savings in both space and money begin to multiply.

I'm still looking for recipes for my husband's favorite bar-be-que sauce, our favorite bourbon chicken from the greasy spoon at the mall, and orange chicken.  Alton Brown piqued my interest in making my own mustard.  I've already conquered Drew's favorite honey-mustard salad dressing, mayonnaise, hummus, and raspberry vinaigrette (all absurdly easy).  We've found fairly simple homemade ice cream and smoothie recipes.  I don't know if I'll ever find a replacement for ketchup, onion soup mix, or for canned cream of chicken soup (used in several dishes that are family favorites), but those cans, bottles, and boxes can be used in more than one dish, so I'm philosophically okay with them, at least for now.  (I have tried a replacement for the cream of chicken soup, but it wasn't worth the time it took to cook and it wasn't really a good substitute for the concentrated soup in the can - the texture was all wrong.)

SDG!

30 April 2009

And the Results Are…

Instead of putting boiling water in the jars before pouring in the hot cultured milk, I got the tap as hot as it would go and used that.  The yogurt in the jars thickened up in the same amount of time that the crockpot usually takes and the jars stayed warm under the towel.

This morning, after spending the night in the fridge, it was thick and wonderful.  I think this technique is a winner.

Allison, I went through the grainy and thin yogurt stage and never really figured out why (sun spots?  a butterfly fluttered its wings in Hawaii?  a yogurt curse?).  I've been told that making yogurt is more an art than a science.  I'd let it sit a bit longer next time and see if that helps.  I also found that turning the crockpot on low for about 10-20 minutes if it was taking awhile to thicken seemed to help - at least, I think it did; if I hadn't turned it on, it might have thickened up on its own anyway--no way to tell.  (If I needed to do this with the jars, I'd put them either in a shallow warm water bath on the counter or set them on a heating pad set on low.)

Another tip from Elise - I poured about a cup of the half-&-half and starter mixture into a small jar and set it on the counter under the towel with the quart jars to thicken up.  When the yogurt had thickened, I put the small jar into the freezer.  I'll take it out and let it defrost in the fridge overnight and use that as my starter when I make it next.  This tip might make the starter last longer.  I was using an envelope of cultures every few batches, and using a half to a cup of yogurt itself as a starter in between.  Freezing it will help it remain fresh longer and therefore I can get more batches for each envelope of starter, cutting my costs even more.

SDG!

29 April 2009

Yogurt Revisited

Yes, another post about yogurt!

Why do I keep reading others' yogurt recipes?  Because I just might learn something new.  Well, I think I have.

A couple weeks ago, after the yogurt was done and ready for the fridge, I discovered that I didn't have any quart jars clean.  We had room in the fridge ('Wonder of wonders! Miracle of miracles!'), so I put the whole 1-gallon crock in.  The next day, the yogurt was the thickest I've ever seen (yes, even thicker than store-bought with all its gelatins and guar gums).  We ate it from the crock in the fridge until it was time to make more (it helped that I have two crockpots - I'm 'bi-potal' according to my friend Renee).  I did the same thing with the next batch of yogurt to see if this was a fluke or a discovery - put the whole crock in the fridge, and again, it turned out super-thick.  I thought I was onto something, but unless I assumed all my readers (all 10 of you) are also bi-potal, this wasn't a tip for public consumption.

'So why am I posting this publicly?' you ask.  Good question.  This morning, I was reading Strategic Eating: The Econovore's Essential Guide by Elise Cooke (review coming soon) and she outlined her process for making yogurt.  Honestly, the crockpot is much easier as far as I'm concerned, but she included a step that put the final piece into my yogurt puzzle and that makes this a tip everyone can use.  

After adding her cultures, Elise pours the liquid into jars and then she warms the jars in a hot water bath or in a slow oven.  Well, being the tea connoisseur that I am, I know that no pot of tea is worth its weight in tea leaves unless it's been pre-heated by pouring boiling water into it (and then emptying it) before putting in tea leaves and more boiling water.  Put these two things together and I think I've found an easier way to make my yogurt yummy and thick.

I've got half-&-half heating in the crockpot now.  When it's closer to being the right temp, I'll pour boiling water into four quart-sized jars and one half-pint jar (to hold my starter for the next batch).  I'll mix my starter in, then I'll pour the cultured liquid into the hot jars, wrap the jars in a beach towel, and let the bitty cultures grow.  Once they're firm, I'll put the jars in the fridge.

I'll report back and let you know how my experiment goes.

SDG!

24 March 2009

Bread!

(This is for you, Cora!  If you have any questions, let me know!)

I started with a basic recipe and then researched how bread works and tweaked and tweaked and tweaked (I'm still tweaking, but the foundation is solid).  This is for the Bosch, but it can be cut down and made by hand (see instructions below).

Ingredients:

4 C warm water
2/3 C neutral oil (I use grapeseed or safflower)
2/3 C honey
4 eggs
3 1/2 T instant yeast
3 1/2 T dough enhancer
1/4 C wheat gluten
2 T salt
approx. 5 lbs. freshly-ground whole wheat flour (I like Prairie Gold best.)

Instructions:

Add all the liquid ingredients to the Bosch (set up with the dough hook).  Turn on low.  Add all the dry ingredients except the wheat.  Slowly add the wheat until the dough cleans the sides of the bowl.  Turn the Bosch to the second speed and knead for about 10 minutes (until a small glob of dough can be stretched thin without breaking).

Divide the dough into 6 lumps (mine are about 1-1/4 lb. each).  Using a rolling pin, roll out each lump on an oiled counter; roll into a loaf (similar to making cinnamon rolls) and place seam-side down in a sprayed or oiled, 1-lb loaf pan.  Cover with a tea towel and let rise until at least doubled in size (mine get even bigger).

Preheat oven to 325˚.  Place a metal pie plate or cake pan on the bottom rack.  When the oven is heated, toss 3 or 4 ice cubes onto the pie plate (the extra steam helps the bread to rise higher).  Bake loaves for 28 minutes.  When they're done, flip them out of the pans and onto a rack to cool.  When cool, place in bread bags.  I freeze whatever we won't be using in the next day or so.  Remember, there are no preservatives.

I sometimes brush an egg wash on the loaves and sprinkle with sesame seeds.  I also sometimes add 1/4 C non-instant dried milk for extra calcium.  

This dough can be used for cinnamon bread.  Make the dough as instructed.  Roll out enough for a loaf very thin; sprinkle brown sugar and cinnamon on the rolled-out dough.  Roll up and bake as directed.  (You don't want to put cinnamon into the dough itself as it will inhibit rising.)

I also add herbs and olive oil and sometimes substitute white bread flour for some or all of the flour.  I have a baguette pan that I'm eager to try.

By Hand:

To make without a Bosch, halve the recipe (it's pretty hard to stir that much dough by hand).  Place liquid ingredients into a large bowl.  Place all dry ingredients into the bowl (except flour).  (Even though most recipes tell you to proof the yeast in water and sugar or honey before adding the other ingredients, when I was first learning and doing it by hand, one of my recipes explained it the way I've explained it and it turned out better.)  

Add the flour a cup at a time, stirring with a wooden spoon until it's too hard to stir.  Dump it out onto a well-floured counter and continue to add flour until it's got enough (the amount of flour used varies, depending on your weather and the moisture content of your flour).  Once you have enough flour, continue to knead by hand, adding as little additional flour as you possibly can.  Kneading develops the gluten, which traps the carbon dioxide released by the yeast, which makes the bread rise.  It's also a great time to pray about worry or frustrations.

Oil a large bowl; place the dough in it and then flip the dough over.  Cover with a tea towel and place in a warm place until the dough has at least doubled in size (an oven, heated to 150˚ and then turned off works very well).  Punch it down.  You can either flip it over and let it rise in the bowl again, or you can go straight to forming your loaves.  An extra rise will make it more fine (less coarse).  Bake as directed above. 

SDG!

14 March 2009

Pizza Crust

I've been thinking about posting this recipe for awhile, but have had a fire lit under me by a friend who lives in Tucson.  Thanks, Amy!  I don't remember exactly where I got this recipe (somewhere back in the deep, dark days just after the birth of the internet), but it says it's a knock-off of Pizza Hut's crust recipe.  I happen to think it's much, much better.  I've tweaked it a bit and we divide the dough into 12ths for individual pizzas.  [Edit: I miscounted - I split the dough into 16ths.  Those of us with smaller appetites have one, and we have extra for those of us (teen-aged boys) who have huge appetites.)  We also like them thin and crispy, so I roll them out thin with my marble rolling pin.  Since we like it thin, I've cut the yeast in half and we're planning to cut it again (possibly even eliminate it) to see if it makes any difference in the final product.  I'll post the recipe as written with my tweaks in italics.

2 packages dry yeast (I used 2 T instant yeast, but have recently cut back to 1 T and will try 1/2 T tonight)
2/3 C warm water
2 T and 2 tsp sugar, divided
2 C cold water
3 T corn oil (I use olive oil)
1/4 tsp garlic salt (I use fresh chopped garlic.)
1 tsp salt (I like sea salt.)
1/2 tsp oregano (We're big basil fans, so we skip the oregano and use fresh basil if we have enough, or dried basil if we don't.)
6 1/2-7 C all-purpose flour (I don't measure in the Bosch and tonight I'll be using fresh flour, finely-ground from Prairie Gold wheat)

In a large bowl, add 2 tsp sugar to the warm water, then stir yeast into the sugar solution.  Let stand until bubbly (about 5 minutes).  Add the rest of the liquid ingredients.  Add the garlic, salt, and herbs to the liquids.  Slowly add in the flour, mixing well with a wooden spoon after each addition, until you can no longer stir the dough.

Empty dough into a floured counter and begin to knead, adding more flour as necessary.  Knead until the dough is elastic.  Place the dough into a greased or oiled bowl, flip it over so the oil coats the top and cover with a tea towel; let it rise until about doubled in size.  The bowl (if it's heat-proof) can be placed in a warm oven: heat the oven to 150˚, turn it off, then place the dough in the oven.

When dough has doubled in size, oil your fist and punch it down (from here on out, you don't want to add more flour to the dough, so use oil, but a little goes a long way).  Split the dough in two and roll out on oiled counter into two 15" round crusts.  Let rise for 20 minutes.  Bake at 450˚ for 20-25 minutes on oiled pizza pans or stones that have been sprinkled with cornmeal to prevent sticking.

Top your pizza and bake until cheese is melted and toppings look just the way you like them.

The way I do it: place all ingredients except the flour into the bowl of the Bosch with the dough hook.  Mix together and begin adding flour, until it cleans the sides of the bowl.  Knead until the dough is elastic and stretches without breaking (about 10 minutes).  

Divide dough into 12 pieces (some of mine are larger and some are smaller, but my kids are also larger and smaller, so it works).  Roll out each piece very thin; poke holes with a fork to allow steam to escape.  If the dough doesn't want to roll, let it rest for 10-20 minutes, then roll it out.  Grill or bake on pizza stones at 500˚ for about 5 minutes each.  Allow each person to 'decorate' his pizza and place back in the oven (at 400˚) or onto the grill until cheese is melted.  Using a pizza peel, we put the pizzas directly on the oven racks for this second baking or directly on the grill.

Slice and enjoy.

This is a great dish to make when having people over.  Our favorite times of hospitality have been when we've invited new friends over and we put them to work in the kitchen.  It's so fun to cook together.  Working together seems to break down barriers to relationship better than almost anything we know.

SDG!

09 February 2009

Granola!

This recipe originally came from Susie Castleberry, by way of Mary Pride's old HELP newsletter.  I've tweaked it a bit.  

8 cups old-fashioned rolled oats (I've substituted rolled wheat and barley for two cups each of the oats; they add an extra bit of texture to the finished granola - have to find new sources for them, but I have a few ideas)
1 cup almonds, sliced or slivered
1 cup coconut, shredded
1/2 cup brown sugar
1/2 cup honey
1 cup butter, melted
1 teaspoon salt
1 tablespoon vanilla extract

Preheat oven to 250˚.

Combine the dry ingredients in a large bowl (I use my hands - easier to break up the brown sugar and I get to play with my food).  Add the vanilla to the melted butter, then add all the wet ingredients to the dry ingredients.  Stir until dry ingredients are uniformly moistened.  

Pour out onto two jelly roll pans (I use my jelly roll stone and my 9x9" square stone and my 9" round stone; before I had stones, I'd use a metal jelly roll pan (ie: cookie sheet) and a pizza pie pan).  Bake at 250˚ for 45  minutes.  Reduce oven temperature to 200˚ and bake for an additional 30 minutes.

Remove from the oven and let cool in the pans.  When cool, break apart and store in an air-tight container.  I have no idea how long it'll be good, we usually go through it in just a few days.

Variations:

Butter-Maple: Substitute grade B maple syrup for the honey and maple sugar for half the brown sugar.  Add 1 tablespoon buttery sweet dough bakery emulsion or butter flavoring (here or here)  You can also add maple flavor.

Valencia Orange: Add 2 tablespoons dried Valencia orange peel (or fresh orange zest) with the dried ingredients and orange bakery emulsion or orange extract with the vanilla.  I use orange blossom honey for this when possible, instead of the clover honey I buy in bulk at Costco.

Cinnamon and Spice: Add 1 tablespoon cinnamon, 1/4 teaspoon mace, and 1/4 teaspoon ground cloves to the dry ingredients.

In the crockpot: Instead of baking it, I'll put a batch into the crockpot on low for about 4 hours, stirring whenever I begin to smell it.  This gives a bit of a different texture as it doesn't clump up as much as when it's  baked, but it's still good and I can make three batches at a time: one in the oven and one in each crockpot.

You could add different kinds of nuts, sunflower seeds, sesame seeds, or whatever.  I've seen recommendations for dried fruit, too (we're not much on dried fruit here, except dried bing cherries).  We like ours a bit on the simple side and would rather play with flavours than textures.  I used mixed grain cereal from the healthfood market, but I didn't like the taste that the sunflower seeds gave the finished granola.

I'm looking for a recipe to turn this into crunchy granola bars.  I've lost the recipe that was in that original newsletter.  I'll post it once I find one we like.

SDG!

07 February 2009

Playing with Yogurt

Earlier this week I made a batch of yogurt.  After 4 1/2 hours, it still hadn't set, so I turned the crockpot on low for about ten minutes and then re-wrapped it and promptly forgot about it.  Three hours later, it had set up as firm and thick as sour cream.  It was the best I'd ever made.

I tried again yesterday, doing the same thing I'd done earlier in the week (10 minutes on low after 4 hours and then letting it go for another 2 or 3 hours).  Again, it turned out just fabulous!

Now that I'm getting a better handle on yogurt, I'm beginning to research using yogurt as the basis for cream spreads, creamy salad dressings, and recipes to use it in (as a replacement for sour cream, for example).  I'll keep you posted!

SDG!